Here’s how to set up shopify store in 10 minutes only . Free 14 Days shopify trial link is included in this Article. This is Last Article you will ever need to go through before creating your shopify store. Click here to grab it.
Although creating shopify store is very easy. Thanks to shopify developers and internet capitalism.
Anyone from any background can easily create professional shopify store without any technical knowledge.
Shopify stores are just drag and drop with basic to advanced capabilities.
Shopify stores could be used by anyone from small business owner to Billion dollar business owners/ Brands and of course by Dropshippers.
Shopify stores are loaded by professional attractive free and paid themes, well maintained free and paid Apps, Integrations for several Payment gateways, courier services API’s , Basic and Advanced Report Analytical Tools and the Best customer support in the world(not exaggerating) .
Signup For Free Shopify 14 Days Trial by Clicking here.
If you need help with creating store or any doubt. Please don’t hesitate to email us on [email protected]
Now, coming to the point.
How to set up shopify store?
First of All. Go on this link and create free shopify account with basic information i.e Full name, Email, Password, Store Name.
Once you Signup for Shopify Store using this link by clicking here . Follow Step by Step with this article.
How to Pick Shopify Store Name?
Store name should be related to your category/theme/Aim of your store. Short Shopify store names work Best. Below you will see structure of shopify store names that other stores are using.
- [YourBrand][Main Product] (e.g. helmboots)
- Shop[YourBrand] (e.g. sandytoesshop)
- Get[YourProduct] (e.g. getflow)
- [YourBrand]co.com (e.g. shopmeek)
- [YourBrand][industry] (e.g. lifeinspirithome)
- [Verb][YourBrand] (e.g. wearpepper)
- [My/Your][YourBrand] (e.g. mybillie)
Shopify Store name are unique to individual stores and they are identities of your store. Once created store names can be changed but the store name URL cannot be changed which are created by your original shopify store name. which looks like this ” shopmeek.myshopify.com”.
Signup For 14 Days Free Trial by clicking here.
How much does a Shopify store cost?
Basic Shopify Cost USD $ 29/month + 2.0% transaction fee , Shopify Plan Cost USD $ 79/month + 1.0% transaction fee , Advanced Shopify Plan Cost USD $ 299/month + 0.5% transaction fee. Signup For 14 Days Free Trial by clicking here.
Which Shopify Plan Should I Choose?
To Start with, You can go with Basic shopify store plan which is used by most people and good enough to start for any level of Business.
Once, You are done above procedure. You just have to fill your basic information like name,address, phone number etc. After clicking Next you should be seeing Homescreen.
Congratulations!! You have created your own shopify ecommerce store. Welcome to Awesomeness..
Once, you pick your plan and add your card details. you will see “Disable password” hovering on your homepage which can be disabled by clicking on that hovering button and unchecking the option ” Enable Password”.
For Now, We will keep skip the process of adding the product as it is descriptive and lengthy.
Let’s Pick the Desired theme. Shopify comes with many options of free & Paid themes. Any Free theme will work. Also it can be easily changed later. Most Popular shopify store theme is Debut which is Default Shopify Store theme. In order to modify it, Click on customize.
On the Left Side you will see many options to customize the store front of your website. You can pick Any logo, color, images etc from the theme settings option. Feel Free to explore that section. Whatever elements you like, you can just click on ” Add a Section” and Add it to your website home page.
Now comes the part where you can Add the Custom Domain to your Shopify Store. Something like google.com, yahoo.com which is basically web address of your website and that is how people can access your website. Shopify Store provides you free domain which is made when you create your store which looks like ” shopmeek.myshopify.com” . If you want you can Buy any custom Domain something like shopmeek.com . You can buy it directly from shopify itself or buy from any third party website like godaddy.com . If you choose to go with custom domain. Below is the structure to pick your custom Domain.
How to Pick Shopify store domain?
- [YourBrand][Main Product] (e.g. helmboots.com)
- Shop[YourBrand].com (e.g. sandytoesshop.com)
- Get[YourProduct].com (e.g. getflow.com)
- [YourBrand]co.com (e.g. shopmeekco.com)
- [YourBrand][industry].com (e.g. lifeinspirithome.com)
- [Verb][YourBrand].com (e.g. wearpepper.com)
- [My/Your][YourBrand].com (e.g. mybillie.com)
After you are done picking your Domain or going with the free and default domain . you can create your listing for your products.
Signup For 14 Days Free Trial by clicking here.
How to List your product on Shopify ?
Click on Add Product or go to Products section on your left and click on Add Product.
Write Any title/name for your product > Write description of your product. i.e Features, Material , product dimensions, weight of the product > Add photos of your product > Enter the listing price of the product. compare price, cost per item field can be kept blank > Select charge tax on this product if you want to charge tax on the product. Tax related settings can be setup in Settings > In the Inventory field you can assign different Skus to individual variant of the product > Select track inventory and fill in the quantity of the product if not it can be left unchecked in that case, products will keep selling without the concern of inventory count > Select the “This is a physical product” if your product is physical product. Yes, you can also sell digital products such as ebooks, digital downloads etc. > Select weight of your product in different Units. Can also be kept blank > Select country of origin of product which also can be kept untouched > Create different variants of product i.e sizes, colors etc. in order to create different sizes just write options like XL , XXL and hit enter or write “,” after every size to indicate it as different size > Last option “Edit website SEO” can be kept untouched and automatically written for you by shopify. To Display your product on store, Do not forget to change product status from draft to active.
Once, Product is created you can add your product to certain category of product knows as “collections”. In order to create collection. On your left side product section click on collections and create collection which can be something like “Beauty” , “Healthcare” etc.
Don’t Forget to change Product Status to ACTIVE .
Now comes the part where you will show your product on your website.
Go to online store > customize > add different sections that you want to show on your home page. there are different ways to display your product. you can display only a single product known as featured product or add a whole collection of product i.e more than 1 product. Choose the desired layout of the product and click on choose the product/ collection of products.
Once done, Congratulations now people can see your product on your store that can be accessed by URL that could be free Domain provided by shopify which looks something like this “https://apple.myshopify.com” and in case you bought custom domain it will be displayed on your custom domain.
Now that people can see your product on your shopify store . Let’s setup Shipping , Taxes, Payment Gateway so people can pay you.
Signup For 14 Days Free Trial by clicking here.
How to Set Up Shipping on Shopify ?
To set up shipping on Shopify for dropshipping, you should follow a number of simple steps below:
From your Shopify admin, you can go to Settings > Shipping. There, you only have to focus on the Shipping profiles area. Settings below the shipping profiles are used as you sell as well as ship the products on your own or use another service.
As you can see, shipping profiles give you a good chance to customize the shipping settings to help fit your business. You can be offer different shipping rates for specific items with locations.
Signup For 14 Days Free Trial by clicking here.
Moreover, Shopify lets you produce up to 100 shipping profiles. The General profile will be created on each store by default.
What your stores need to do is to help you define the number of shipping profiles you have:
- In case you would like to include the same shipping rules for all of the products, it is enough to create a general profile.
- In case you would like to set various shipping rules for various products or locations, then creating multiple shipping profiles are a must.
Produce flat shipping rates
Flat shipping rates can charge an fix amount for the shipment at checkout. Shopify let users create flat shipping rates for each order in the shipping zone or only for orders that weigh or cost in a specific range. For instance, in the shipping zone for Europe, you are able to set up a flat rate of $10 or other flat rates of $5 for orders which are over $50.
Generally, shipping rates are counted based on the order price that considers the cart’s total value while the shipping rates are based on the order weight considering only items in the location group or shipping profile they belong to.
-
Step 1: Head to
Settings > Shippingunder your Shopify admin
-
Step 2: Choose
Manage ratelocated next to the shipping profile you wish to insert a shipping rate.
-
Step 3: Select
Add ratesituated beside the zone you really want to include a rate into.
- Step 4: Type the name as well as the amount for the rate.
- Step 5: This step is optional. If you want to add weight-based or price-based conditions:
- Choose
Add conditions. - Opt for whether you want to base the condition on order price or weight.
- Type both minimum and maximum value for this condition.
-
Step 6: Don’t forget to click on
Done, then click onSave.
Generate calculated shipping rates
Calculated shipping rates are used to be decided at the checkout by the third-party shipping service that is based on the order’s details. This can aid you in charging the customers the exact amount you will be charged by a shipping carrier like FedEx or UPS when purchasing a shipping label.
Take note that the carrier-calculated rates are also available to the store in the scenarios below:
- If you are in the US and are currently use the Shopify Shipping, you can insert calculated rates from DHL, UPS, and USPS.
- If you are living in Canada and using Shopify Shipping, you are able to insert calculated rates from the Canada Post.
- If you possess the carrier-calculated shipping feature on the Shopify plan, you can add rates from your account with UPS, USPS, Canada Post, and any calculated rates from shipping apps. Right before you add your rates from those shipping carriers, you have to make sure that you add your carrier accounts to the shipping settings in the Shopify platform.
As you are able to add the carrier-calculated shipping rates, you can type the extract weights for each item so that the shipping rates can be accurately given to the customers at checkout.
-
Step 1: Head to
Settings>Shipping
-
Step 2: Choose
Manage ratesnext to the shipping profile in which you want to insert a shipping rate.
-
Step 3: Select
Add ratelocated to the location where the rate is added.
-
Step 4: Go to
Use carrier or app to calculate rates.
- Step 5: Opt for the shipping service you would like to insert the calculated rates in your drop-down list.
- Step 6: Click on the shipping methods from the shipping service you want to give it as options when the customers are at the checkout.
- Step 7: This step is optional. Press on if it can offer a new service automatically which the shipping services are available.
- Step 8: This step is optional. Shopify users are able to add handling fees you want to add to your calculated rate.
-
Step 9: Don’t forget to click on
Saveto save what you have done.
How to Setup taxes on Shopify?
On the home page, click “Settings” >> “Taxes”:
Then find the United States and click the button “Set up” or “Edit” (if you’ve previously set up):
Finally, enter in any states where you should be collecting sales tax due to a physical or economic presence. Depending on your Shopify version, you may need to enter your sales tax permit, instead of your zip code:
Setup your sales tax shipping options
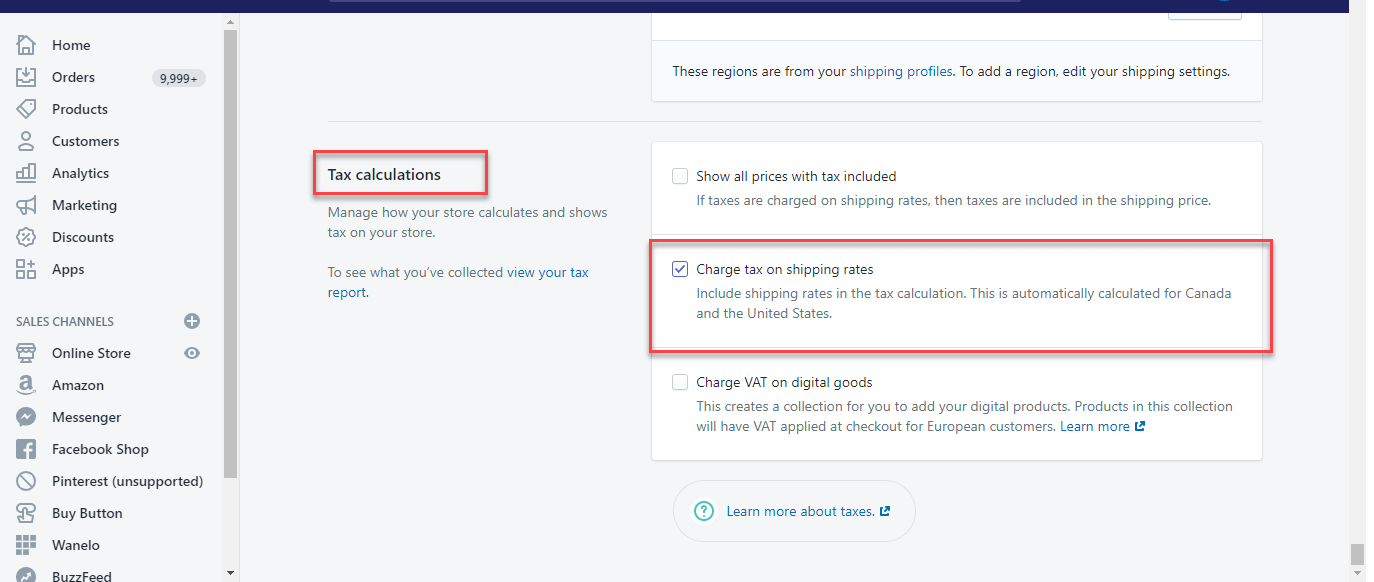
Now, you need to make sure that you collect taxes on shipping rates. Go back to “Settings” and “Taxes”. Down at the bottom you will see a “Tax calculations” section. Select the box that says, “Charge tax on shipping rates”:
Select which products should collect sales tax
Now Shopify needs to know for which products in your store you want to collect sales tax for in the states you have entered. Not all products are taxable. For example, you shouldn’t collect sales tax on gift cards. And states also have differing laws (yeah, not cool). In New York, certain clothing and footwear with a price tag of less than $110 per item are tax-exempt . So, you may want to check the taxability of your products in each state you have nexus.
For your taxable products, go to “Products”, then “All products”. You’ll need to edit each variant of the products you want to collect sales tax for:
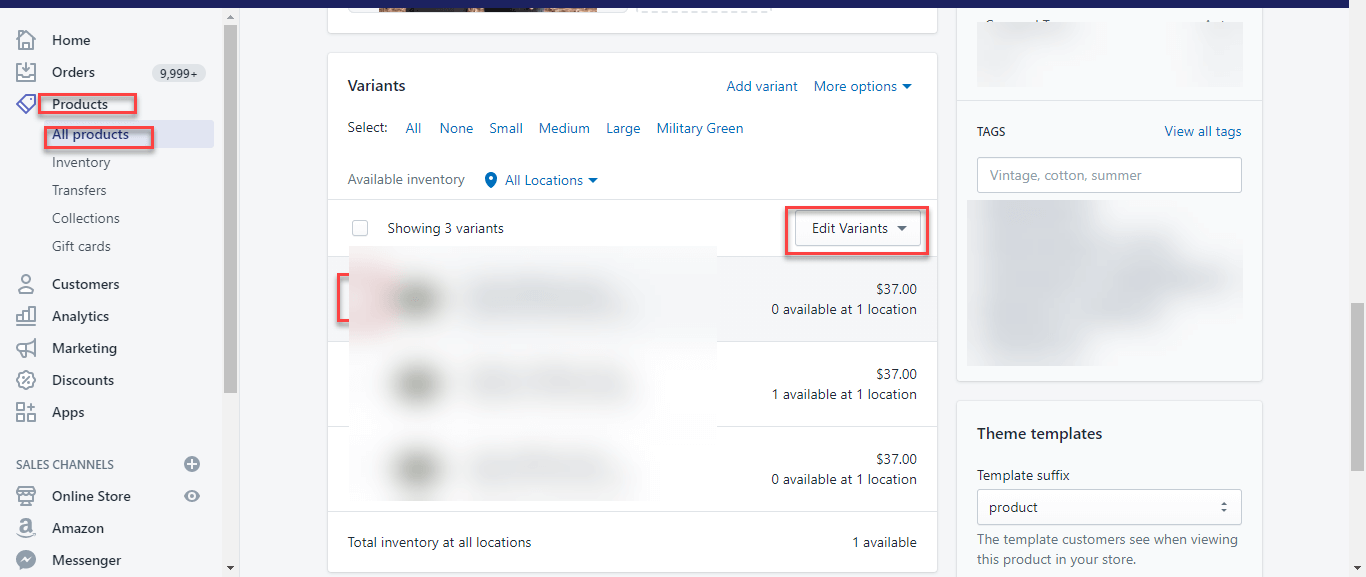
When you go to edit each variant, select the box “Charge tax on this variant”:
Add warehouse locations
Now you need to enter your warehouse locations that are fulfilling orders:
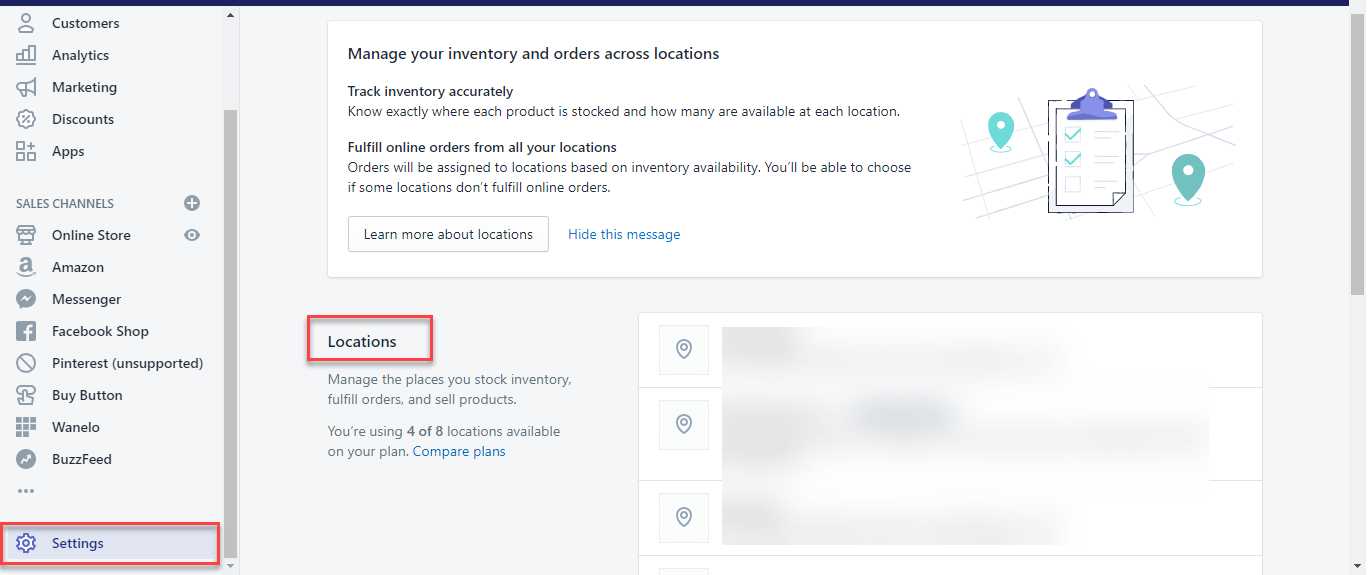
This step helps Shopify know what rates to charge. For example, if product is shipped from a warehouse to a customer in the same state as the warehouse, the sales tax rate may differ than if that product was shipped to another state.
Add information for sales tax exempt customers
Finally, you may not be required to collect sales tax for all your customers. The most common exempt customer you may have is a reseller that buys product through your Shopify store and resells that product. Other tax-exempt entities are government organizations and non-profits. These are likely repeat transactions, and you don’t need to collect sales tax from these customers.
To mark these customers in your Shopify store as tax-exempt. Go to “Customers”, then “Tax Settings”:
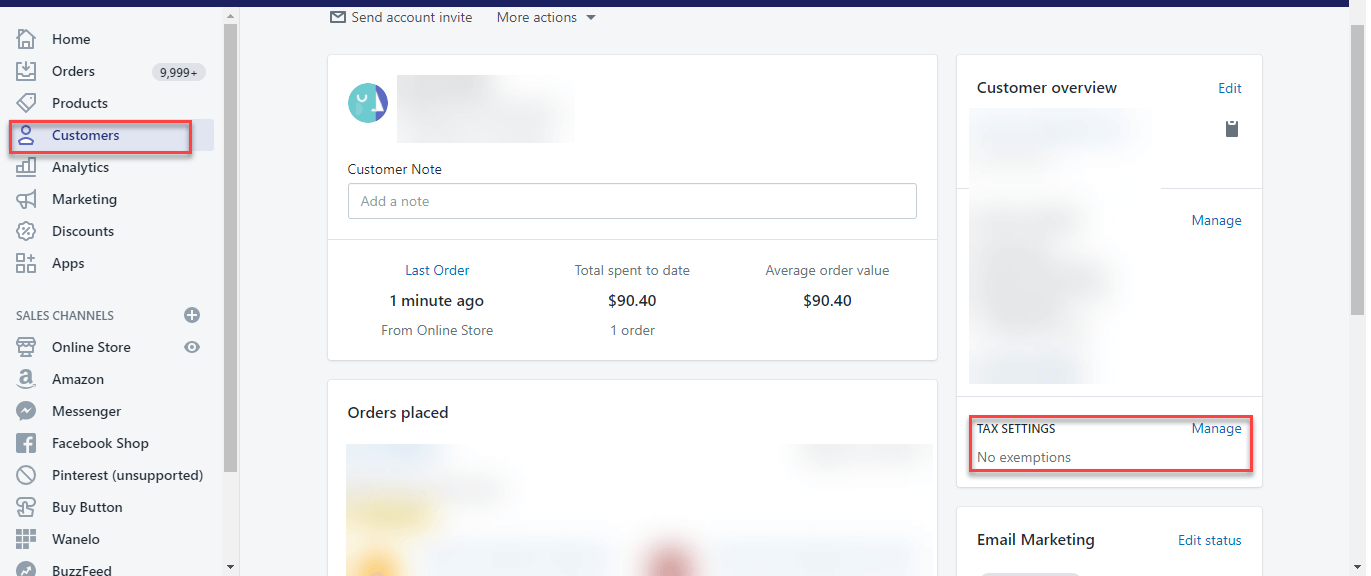
Then make sure the “Collect tax” box is deselected, and you can enter a reason as to why.
Signup For 14 Days Free Trial by clicking here.
How to Setup Payment Gateways on Shopify?
Step 1: Log in to your Shopify Stores. After logging, click on ‘Settings’ which is on the lower left-hand side of the page.
Step 2: Click on Settings. In Settings, click on ‘Payment Providers.’
Step 3: After clicking on ‘Payment Providers,’ you will be directed to a page that consists of various payment options like PayPal, third-party payment providers, manual payment options, and so on, to integrate into your Shopify store. Scroll down to ‘Payment Capture’ before going to any other option.
As shown in the screenshot above, there are two options under the Payment Capture section- ‘Automatically and Manually. It is always recommended to select ‘Automatically’ over ‘Manually’ because Manually capturing payments is possible and suitable when you are a wholesaler and have to wait for a certain period of time for the payments. With ‘Automatically,’ as soon as the order comes in the payment gets captured. Automatically capturing payments avoids fraudulent charges. Moreover, if you are waiting for a longer period for payments, there are possibilities that you may lose money and may come across some fraud orders.
Step 4: Scroll up and go to PayPal Express Checkout. Select ‘Activate PayPal Express Checkout.’
After clicking on PayPal Express Checkout, you will be directed to the PayPal official website. If you have a PayPal account, directly log in. If you don’t have an account, sign up for the same. You have to provide your personal information, bank account details, and so on for activating the PayPal account.
Step 5: Check the 2nd area of payment ‘Third-party providers.’ If you already have a payment gateway, this is suitable for you. Click on ‘Choose third-party Provider.’
After clicking on the ‘Choose third-party provider,’ you will be directed to a page where you get a list of all third-party payment providers. For example, you have already ‘2Checkout’ payment provider. Select from the list as displayed.
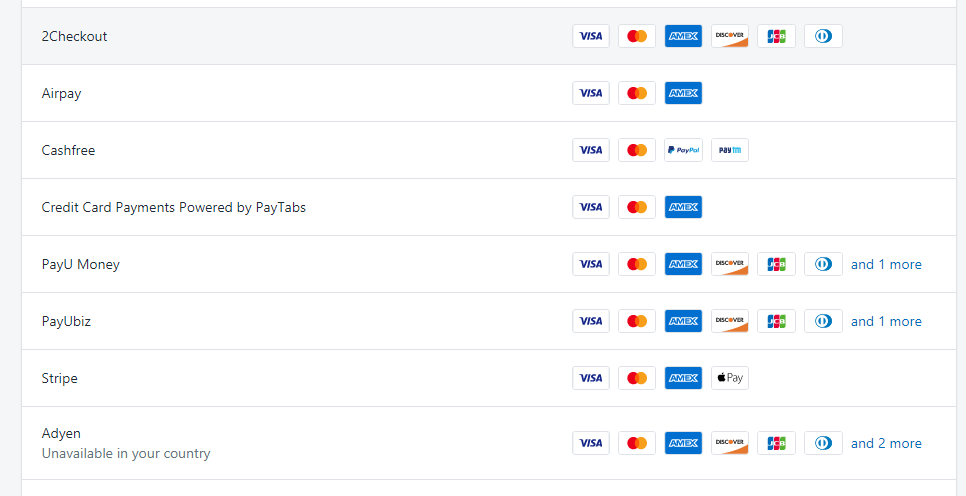
After selecting ‘2Checkout,’ you will be given instruction regarding setting up an account for 2Checkout and activate it. While setting up the account, you will get a merchant code that you need to copy and paste in the ‘Merchant Code’ field. Also, generate a new INS secret word and paste this in the ‘Secret Word’ field. Finally, click on the save settings. The first section after selecting ‘2Checkout’ will appear with a set of instructions as shown below:
The second section is where you have to copy the generated merchant code and secret code.
The third section includes the various credit card payments that you are going to accept. Select the ones you want to accept and unselect the rest of the options. For example, if you want to accept only Visa, Mastercard, American Express, and Diners Club credit cards, select those options.
The last section includes ‘Test Mode.’ In this section, your selected payment gateway’s working, whether the setup is right by simulating failed and successful transactions is checked. Select the checkbox if you want to test the payment gateway. Since we have selected 2Checkout, the display is as follows:
Click on ‘Activate 2Checkout.’
Step 6: The third area of payment is ‘Alternative Payment Methods.’ Click on ‘Choose Alternative payment.’ You will get many alternative payment options as shown below. If any of the payment options aren’t available for your country, it will be displayed below the payment provider.
If you see the list displayed on the left, it shows the payment providers and the drop down is all about payment methods. Now if you select a particular payment method, say, American Express, then the list to the left will change and display only those providers who support payments through American Express. This is shown in the screenshot below:
Once you select the payment methods and a suitable payment provider, you will be directed to a page that consists of the ‘Account information’ and ‘Accepted payment methods.’ Here, we will talk about CCAvenue as we are considering in our example. Under the Account Information section, you will find two fields- Access Code & Working Key. If you have CCAvenue’s account, you can directly login or you have to create it. To get your Access code and working key, Open settings menu→ Select API Keys→ Copy Access code and Working key.
Under the ‘Accepted Information Section,’ select the payment methods that you want to accept and click on the Activate button.
Step 7: The last section comprises of ‘Manual Payment Methods.’ In this section, you can add payment methods like Cash on Delivery(COD), account transfer, money order, and so on. Click on ‘Manual Payment Methods’ and check the options available in the dropdown and select the suitable ones. For example, COD. Also, you have the option to create a custom payment method suitable for your business.

Step 8: Another important area is ‘Shopify Payments.’If you are setting up your store in India, then Shopify payments will not be available to you. It is available to certain countries like the USA, UK, Australia, Canada, Denmark, Germany, Hong Kong SAR China, Italy, Ireland, Japan, The Netherlands, New Zealand, Singapore, Sweden, and Switzerland.
Once you set up your online store in Shopify, if you are in countries other than the above mentioned, the Shopify Payment option won’t appear.
To integrate Shopify Payments,
- Activate Shopify payments from the Payment providers page as you have activated other payments. Click on Add provider.
- To set up Shopify Payments you will require:
- Employer Identification Number
- Banking information
- The average price of the orders.
- The average time to ship.
- You have two options-Shopify Payments and Third-Party credit card provider. Select which credit cards you would like to accept for your online store if you are selecting the Third-party credit card option.
- Select Shopify Payments as it is recommended for Shopify stores. Once selected, press continue, and it will be directed on the previous page.
- You will get an option in the Shopify Payment section ‘Complete Account setup.’ Once you click on this option, you will be directed to a page where you need to feed all the information mentioned in 2nd point.
Once all the relevant information is fed in the fields, you are ready to accept payments with Shopify payments on your online store.
Signup For 14 Days Free Trial by clicking here.
If you need help with creating store or any doubt. Please don’t hesitate to email us on [email protected]
In Addition to setting up shopify store if you want to know in detail about shopify store’s Left Side Bar . Let’s get introduced to left side bar containing sections Products, Orders, Analytics, Discounts, Apps.
Products –
This is the place where you can see products on your store. Along with that you can also see Section for Inventory to manage products inventory and collections. Here, collections is nothing but category for your products. For ex- Beauty , Kitchen , Healthcare etc. After you create your product, you can add those products to particular category.
Orders –
This is the place where you will see orders received from customer.
Drafts-
This is the place where you can create manual orders.
Abandoned checkouts –
This is where you will see orders abandoned by customer i.e non completed orders which were left before checking out.
Customers –
This is the place where you will see information about all your customers including those who did not checkout.
Analytics –
This is the place where you can see detailed analytics about your store (Total visitors, orders, no. of units sold, sources of revenue, sources of traffic etc.)
Discounts –
This is the place where you can create Discount Codes for your store.
Apps –
This is the most Important Part of store where you can see option to visit Shopify Apps Store. shopify app store has range of Apps for all your needs to make your life easier. Everything from marketing, Store customizations, Additional features needs on your store. Everything is included in form of free and paid apps.
Now, Coming to the Sale Channel Section.
Online Store –
This is the place where you have option to customize your store. you can also choose to select between free and paid themes.
Blog Posts –
This is where you can write blog post that you can showcase on your website.
Pages –
This is where you can create different pages on shopify store which can be later added to header menu section to be displayed on your shopify store.
This is where you can create header and footer menu which you can show as header and footer on your website.
Domains –
This is where you can choose and shift between your premium and free domain.
Preferences –
This is where you setup how your shopify store will be shown google and other social media platforms. Also you can setup google and facebook tracking code.
Signup For 14 Days Free Trial by clicking here.
If you need help with creating store or any doubt. Please don’t hesitate to email us on [email protected]
Questions & Answers
Can I change the store name on Shopify?
Yes!
can you write blog posts on shopify?
Yes!
Can you sell digital products on shopify?
Yes! Just uncheck the “This is physical store” option while creating product listing.
what is better than shopify?
Nothing is better than shopify. Get 14 days free shopify trial by click here
How do I sell on Shopify?
you can sell on shopify by signing up for 14 days free shopify trial. click here to signup and follow this article step by step.
Can I buy stuff on Shopify?
Yes, you can both buy and sell on shopify.
Can I sell used items on Shopify?
Yes, you can sell resell used products on shopify stores.
Why is Shopify so popular?
Once you go through this article, you will know the answer yourself.
How much does Shopify charge per transaction?
2% on Basic plan and 0.5% on advanced plan.
How do I get Shopify for free?
you can get it free for 14 days. you can signup for free shopify trial by click it here .
What is a good Shopify store name?
you can use this format for picking good shopify store name.
[YourBrand][Main Product] (e.g. helmboots.com)
Shop[YourBrand].com (e.g. sandytoesshop.com)
Get[YourProduct].com (e.g. getflow.com)
[YourBrand]co.com (e.g. shopmeekco.com)
[YourBrand][industry].com (e.g. lifeinspirithome.com)
[Verb][YourBrand].com (e.g. wearpepper.com)
[My/Your][YourBrand].com (e.g. mybillie.com)
How do I create a dropshipping business name?
you can use this format for picking good shopify store name.
[YourBrand][Main Product] (e.g. helmboots.com)
Shop[YourBrand].com (e.g. sandytoesshop.com)
Get[YourProduct].com (e.g. getflow.com)
[YourBrand]co.com (e.g. shopmeekco.com)
[YourBrand][industry].com (e.g. lifeinspirithome.com)
[Verb][YourBrand].com (e.g. wearpepper.com)
[My/Your][YourBrand].com (e.g. mybillie.com)
Is Shopify multilingual?
Yes, Shopify has option to change languages.
you can get it free for 14 days. you can signup for free shopify trial by click it here .
If you need help with creating store or any doubt. Please don’t hesitate to email us on [email protected]
